Reading Time: 3 minutes
free ssl certificate let’s encrypt
Table of Contents
What is SSL
SSL (Secure Sockets Layer) and its successor, TLS (Transport Layer Security), are protocols for establishing authenticated and encrypted links between networked computers. SSL protocol was deprecated with the release of TLS 1.0 in 1999, but it is still common to refer to these related technologies as “SSL” or “SSL/TLS.” The most current version is TLS 1.3, SSL is a widely used protocol. We have a detailed tutorial on What is tls and SSL, Please go through it.
I have explained detailed steps for checking the SSL expiry date of any website using OpenSSL commands. Please check the tutorial here.
What is Let’s Encrypt
Let’s Encrypt is a global Certificate Authority (CA). Let Companies and organizations around the world obtain, renew, and manage SSL/TLS certificates. Our certificates can be used by websites to enable secure HTTPS connections. Let’s Encrypt offers Domain Validation (DV) certificates, You can also use its free service to generate SSL certificates.
Requirement
- A computer running MacOS. You can also use Linux System
- You need to have a reliable internet connection.
- Basic level of comfort with running commands in a terminal (called a command prompt in Windows).
- Homebrew: If you are using MAC then it is required however if you are using a Linux system then please ignore it. This is software that helps you install other software on a Mac. You can find instructions for installing it here.
- You must have a valid domain and admin access to your DNS panel. If you are not a DNS admin and another team is managing for you then you can contact them to create a DNS record for you.
Manually creating a free SSL certificate
Install Certbot
To install Certbot on MAC, You can open the terminal and then run the below command.
$ brew install certbot
Linux Systems – Use the Below steps
If you are using a Linux system then install Certsbot using the below command however you need to install snap first then install Certbot.
$ sudo yum install snapd
$ sudo systemctl enable --now snapd.socket
$ sudo ln -s /var/lib/snapd/snap /snap
Install certbot on Linux or CentOs

$ sudo snap install --classic certbot
Prepare the Certbot command
$ sudo ln -s /snap/bin/certbot /usr/bin/certbot
Create a directory for Let’s Encrypt
Create a directory in a location you like (e.g in your home directory, your Desktop directory etc) and give it a name you want. Let’s say we want to use YOUR_HOME_DIR/lets-encrypt. We can create the said directory by running this command:
$ mkdir ~/lets-encrypt
prove that you own the domain
You need to prove to Let’s Encrypt that you own this domain Before getting an SSL certificate for a domain . To do this, you need to solve a “challenge”. That is, do something that you would not be able to do if you didn’t own the domain and have admin access to it. You can do this by either uploading a file to a specific path on your server (called the HTTP challenge) or you need to add a certain DNS record to your domain (called the DNS challenge). I think the HTTP challenge is easier. I also think it should be faster for Let’s Encrypt’s servers to notice to it since DNS changes might take a while to propagate.
As explained above you have two options, One is HTTP challenge and other is DNS challenge. I will explain DNS method first then explain HTTP method.
DNS Challenge
free ssl certificate let’s encrypt
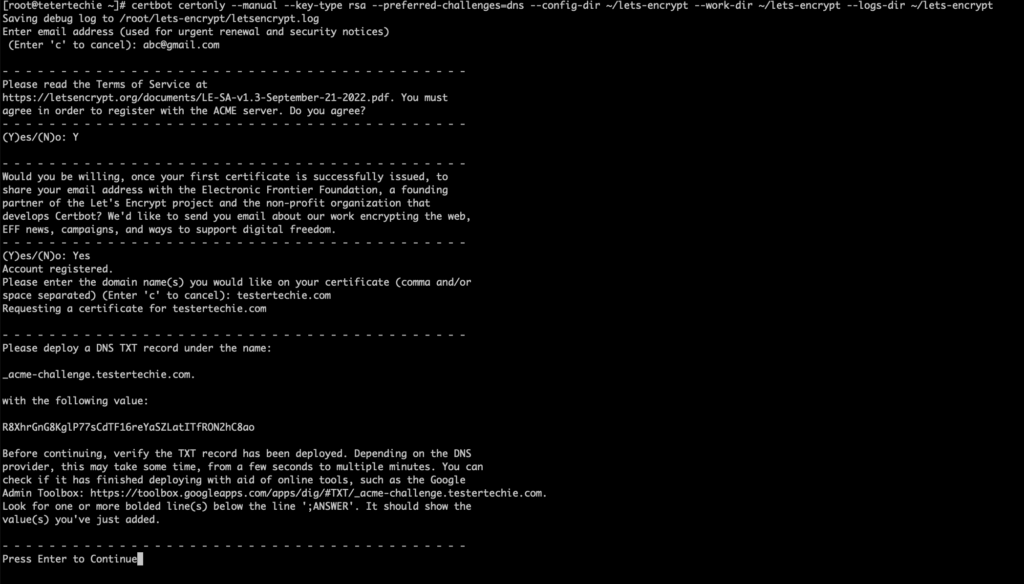
certbot certonly –preferred-challenges=dns –manual –config-dir ~/lets-encrypt –work-dir ~/lets-encrypt –logs-dir ~/lets-encrypt

Enter Email Address
Enter Yes – If you want your certificate to get on email
Enter Domain
Do not Enter Continue
ADD DNS TXT Record
Login to your DNS Panel and add the TXT Record that you get from the above command.
In this case, we added the below TCT record
Please deploy a DNS TXT record under the name:
_acme-challenge.testertechie.com.
with the following value:
R8XhrGnG8KglP77sCdTF16reYaSZLatITfRON2hC8ao
Enter Continue Now
You are all set, This certificate will be valid for 90 days.
