
Reading Time: 4 minutes
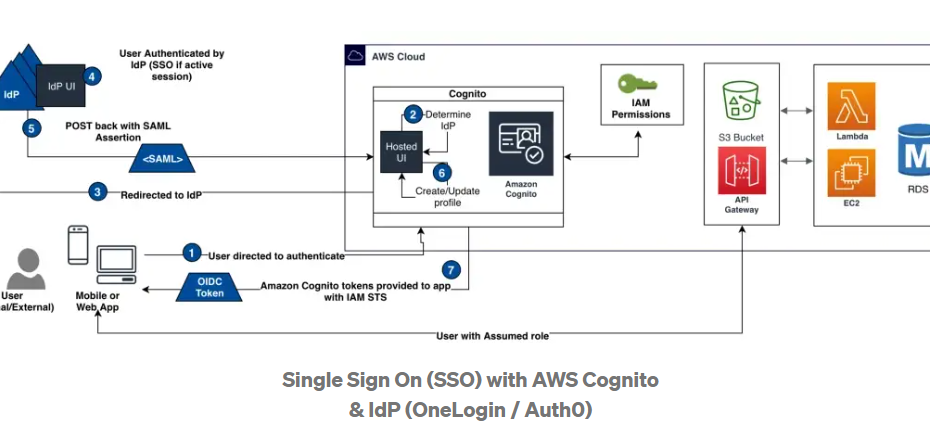
This article will guide you on how to set up AWS Cognito User Pool Federation With Onelogin IdP. If you use Cognito then Cognito lets you add user sign-up, sign-in, and access control to your web and mobile apps quickly and easily. But more importantly, Cognito lets you manage user’s access to the AWS Services (Example S3) with fine grain permissions through temporary credential tokens from underlying STS (Security Token Service).
Table of Contents
Create a OneLogin account
For more information, see the OneLogin website, and then select Start a free trial.
On the account creation page, under Your OneLogin Domain, note the domain that OneLogin provides.
Create a OneLogin application
1. On the OneLogin portal page (https://your-new-domain.onelogin.com/portal/), choose Administration.
2. At the top of the Administration page, pause on Apps, and then choose Add apps.
3. In the search bar under Find Applications, enter saml, and then choose SAML Custom Connector (Advanced) to open the Add SAML Custom Connector (Advanced) tile.
4. (Optional) Do any of the following:
For Display Name, enter a name and description. For example, Cognito Setup (IdP).
For Rectangular Icon and Square Icon, upload thumbnail icons following the specifications on the page.
For Description, enter a short summary description. For example, For Amazon Cognito user pool.
5. Choose Save.
AWS Cognito User Pool Federation With Onelogin IdP
Edit your OneLogin application configuration
1. Choose Configuration.
2. On the Configuration page, do the following:
For RelayState, enter any valid URL, such as https://www.example.com.
For Audience, enter urn:amazon:cognito:sp:yourUserPoolId.
Leave Recipient blank.
For ACS (Consumer) URL Validator, enter https://yourDomainPrefix.auth.region.amazoncognito.com/saml2/idpresponse.
For ACS (Consumer) URL, enter https://yourDomainPrefix.auth.region.amazoncognito.com/saml2/idpresponse.
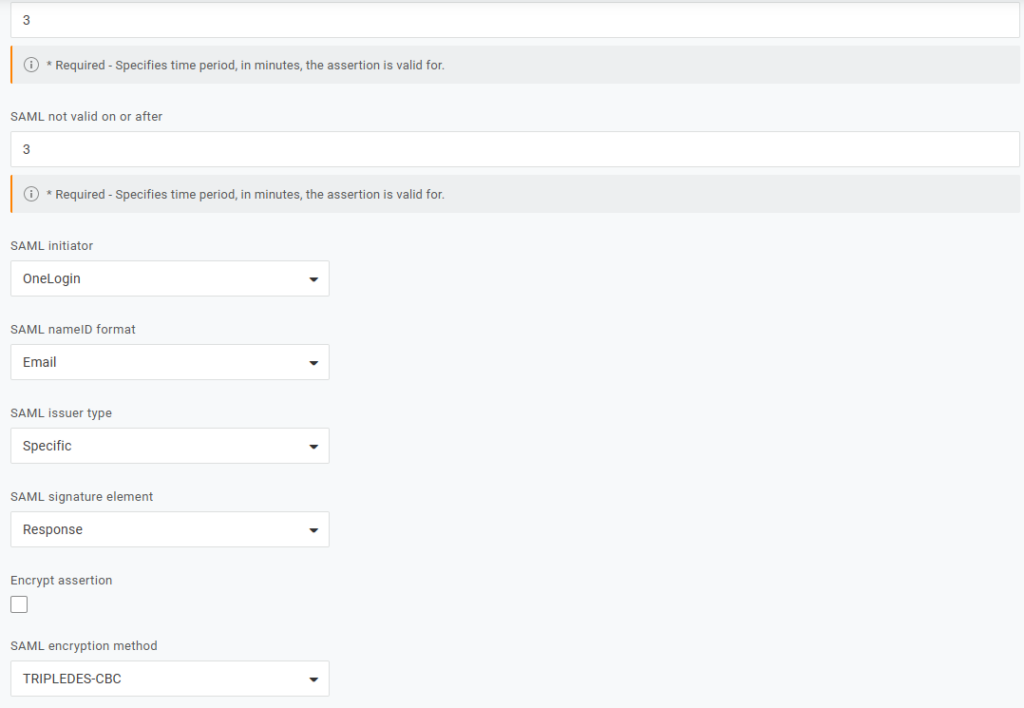
- SAML signature element
- SAML initiator – Select “OneLogin”
- SAML nameID format – Select “Email”
- SAML signature element – Select “Response”
- SAML issuer type – Select “Specific”
- SAML encryption method – Select – TRIPLEDS-CBC
- Save
Note: For Audience, replace yourUserPoolId with your Amazon Cognito user pool ID. Find the ID in the Amazon Cognito console on the General settings tab of the management page for your user pool.
For ACS (Consumer) URL Validator and ACS (Consumer) URL, replace yourDomainPrefix and region with the values for your user pool. Find them in the Amazon Cognito console on the Domain name tab of the management page for your user pool. Please follow the complete steps so you can configure AWS Cognito User Pool Federation With Onelogin IdP
Edit your OneLogin application’s parameters
1. Choose Parameters.
Note: One parameter (NameID (fka Email)) is already listed—this is expected.
2. Choose Add parameter to create a new, custom parameter.
3. In the New Field dialog, for Field name, enter http://schemas.xmlsoap.org/ws/2005/05/identity/claims/nameidentifier.
4. For Flags, select the Include in SAML assertion check box.
5. Choose Save.
6. For Value, choose Email from the list.
7. Choose Save.
Copy the IdP metadata for your OneLogin application
1. Choose SSO.
2. Under Issuer URL, copy the URL to your clipboard.
3. Choose Save to save all your changes to your OneLogin application.
Configure OneLogin as the SAML IdP in Amazon Cognito
For more information, see Creating and managing a SAML identity provider for a user pool. Follow the instructions under To configure a SAML 2.0 identity provider in your user pool.
When creating the SAML IdP, for Metadata document, paste the Issuer URL you copied.
Map the email address from the IdP attribute to the user pool attribute
For more information, see Specifying identity provider attribute mappings for your user pool. Follow the instructions under To specify a SAML provider attribute mapping.
When adding a SAML attribute under Attribute mapping, for SAML Attribute, enter http://schemas.xmlsoap.org/ws/2005/05/identity/claims/nameidentifier. For User pool attribute, choose Email from the list.
Change the app client settings in Amazon Cognito
Note: This is an example setup for testing purposes. For a production setup, it’s a best practice to use the Authorization code grant OAuth flow for your app client settings. When you use that flow, you receive an authorization code after authentication in your redirect URL. You must exchange the authorization code for JSON web tokens (JWTs) by making a request to the token endpoint. AWS Cognito User Pool Federation With Onelogin IdP setup is simple however consider setting up MFA on OneLogin etc. If you set up MFA and have a proper approval process then AWS Cognito User Pool Federation With Onelogin IdP is easy to manage.
1. In the Amazon Cognito console management page for your user pool, under App integration, choose App client settings. Then, do the following:
Under Enabled identity providers, select the Select all check box.
For Callback URL(s), enter a URL where you want your users to be redirected after logging in. For testing, you can enter any valid URL, such as https://www.example.com.
For Sign out URL(s), enter a URL where you want your users to be redirected after logging out. For testing, you can enter any valid URL, such as https://www.example.com.
Under Allowed OAuth Flows, select at least the Implicit Grant check box.
Under Allowed OAuth Scopes, select at least the email and openid the checkboxes.
2. Choose to Save Changes.
For more information, see App client settings terminology.
Test the login endpoint
1. In your browser, enter https://yourDomainPrefix.auth.region.amazoncognito.com/login?response_type=token&client_id=yourClientId&redirect_uri=redirectUrl.
Note: Replace yourDomainPrefix and region with the values for your user pool. Find them in the Amazon Cognito console on the Domain name tab of the management page for your user pool. Replace yourClientId with your app client ID, and replace redirectUrl with your app client callback URL. Find them in the Amazon Cognito console on the App client settings tab of the management page for your user pool.
For more information, see How do I configure the hosted web UI for Amazon Cognito? and login endpoint.
2. Choose OneLogin.
Note: If you’re redirected to your app client’s callback URL, then you’re already logged in to your OneLogin account in your browser. Everything is set up correctly.
3. On the OneLogin page, for Username, enter your OneLogin account user name.
4. Choose to Continue.
5. For the Password, enter your OneLogin account password.
6. Choose to Continue.
If you’re redirected to your app client’s callback URL, then everything is set up correctly.
We hope you are able to successfully set up AWS Cognito User Pool Federation With Onelogin IdP however please do let us know if any queries.
You can read more about AWS here